August 31, 2010

Wanna Join Us?

This week Your Memories Here is sponsoring the sketch challenge at Sketchy Thursdays.
Here is the sketch:

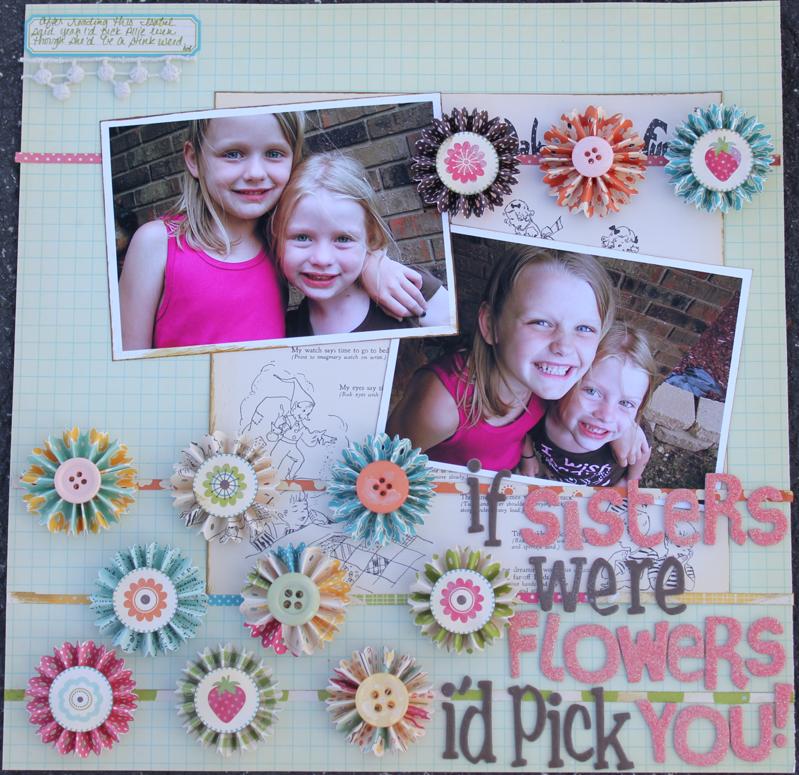
And here's my take on it:

I pretty much kept to the sketch except swapping a couple of Prima flowers for some of the circles.
The burgundy papers are from the new "Not So Traditional Christmas" kit and the other papers are from the SEI Windsor paper pad. I used my Cricut and the Plantin Schoolbook cartridge to cut out my title.
The prize up for grabs is this "Spooky" Halloween scrapbook kit from Pebbles Inc. And for more fun I've added two Hallowhimsy Snag 'em stamps and a bottle of the new Fall 2010 Pomegranate Glimmer Mist.


So head over to Sketchy Thursdays and submit your layout for a chance to win those spooktacular goodies just in time for Fall.
Be sure to scroll down and have a look at what the rest of the design team did with this sketch.

August 30, 2010

Baby Love

Happy Monday, hope you had a great weekend! For this LO the DT and I got to play along with a sketch from Sketchy Thursday, I really loved the circle elements on it. I used some gorgeous Prima Water Color Rainbow Collection paper for my base and then kept the rest pretty neutral adding a bit of color with the Prima flowers and Golden Berry Dew Drops. I also used a couple of Cuttlebug embossing folders on my circle mats and used my Cricut (All Mixed Up) to cut my title. The beautiful trim, also from Prima finished it off. My DD is such a "little mommy" and she was so excited to get this new baby doll as an unexpected gift one day. Mind you, she is pretty rough with her babies too, such a funny contrast *lol* Be sure to stop on by the Your Memories Here store if you haven't in awhile, Kristina always has great product for a great price. Thanks so much for stopping by!

August 28, 2010

YMH is sponsoring Sketchy Thrusdays challenge and you will love the prize that is being offered.
Isn't that prize just yummy looking! Be sure you play along with Sketchy Thursday Challenges so you can have a chance at winning the goodie prize.

I have been wanting to scrap this moment for awhile now and thought it would look great with this sketch. My boys love to wake each other up and it's always a time of wonderful laughter. I managed to capture them on film one day doing what they do best during a wake-up call: loving and laughing with each other.


I used a background technique I learned about from My Tattered Angels using bleach and Glimmer Mists (of which you can get over at YMH). Such a fun and messy technique but be sure to wear old clothes when doing this. I used a multi-liner pin to draw the lined border and of course the circles where punched from some scrap designer paper from YMH that I had left over from some of my projects I've done recently (one of which I'm still holding out on ya'll until next week).

August 27, 2010

You Make Me Smile

Happy Friday!
As you may know, YMH is sponsoring Sketchy Thursdays Challenge Blog this week. The YMH DT was invited to play along with their sketch so I'm here to share my layout with you today.
Here it is:
When I first saw this sketch I thought "Whoa, that's a lot of circle elements." then I pulled out this beautiful Prima paper called Strawberry Kisses- Daydream. I noticed that those glorious blooms were pretty much in the right place to go along with the sketch so I went with it :) Tucked in there (as part of the circle elements) are my 2 boys when they were little- tear, tear. And those pics definitely have a story to tell and it goes with my title. The journaling happens to also be part of the title. It reads: "Only my boys can make me mad and MAKE ME SMILE in the same sentence!"- and it's so true!!!

I used my Gypsy & Cricut to weld & cut out the title. I used Rose leaves & Prima flowers as photo corners. I also decided to print out my pics in black & white so they would stand out from all the vivid colors & design of the page.

The rest of the DT will be sharing their fab takes on the sketch during the week, so please pop by & check them out.

Thanks for peeking today & have a fab weekend!

August 26, 2010

Stetchy Thursdays Sponsor

For this week (August 26 - September 1) Your Memories Here is sponsoring the Sketchy Thursday's challenge. We were lucky enough to get a sneak peek of the sketch early so we could play along with the Sketchy Thursdays Design Team. Head over to Sketchy Thursdays to play along for a chance to win this:

It's a Halloween 12x12 layout kit with 6 sheets of double sided paper, 2 sheets of stickers, die cuts and a yard of ribbon. PLUS you'll get 2 Hallowhimsy snag 'em stamps and a bottle of Pomegranate Fall 2010 Glimmer Mist.
So here's the sketch:

Here's our DT's interpretation of the sketch
Kimberly

Cassie

Crystal

Karli

Kristina

Leah

And if you want to know how we made our layouts, stay tuned all this week as each day we'll be sharing the details of out projects.

August 25, 2010

"Live, Love, Craft" 8x8 Scrapbook layout - Beige

Hi Everyone:

It's Jess from KinderStampO. My project for this week is a fun "Live, Love, Craft" 8x8 Scrapbook layout. The kids and I went to a pottery class a couple of weeks ago and had a blast.

I did a couple of fun things on this layout. The paper behind the photos is just a beige torn piece of cardstock that I painted gold dots with an Adirondack Acrylic Dabber. I then distressed it with Tim Holtz vintage photo Distress Ink and then inked the edges. I then added an animal print ribbon to the edge. The tags were hand cut in a rectangle s and then I clipped the corners with a paper punch. I then wrote the words Live, Love, Craft and distressed it to make them look a little more vintage. I added a bit of vintage photo around the layout and then outlined the butterfly with Stickles and added a few random dots. The paper is Seaside from the Prima Pastiche Collection and can be found at Your Memories Here. Hope you like it.


How I made it:

Stamps
No stamps
Embellishments
Eline Pearls
Animal Print Ribbon
Prima Flowers
Paper
Prima Seaside Pastiche Collection
Punches
Hole punch
Martha Stewart Photo corner punch

Happy Crafting,
Jess

August 24, 2010

Get Well Cards

Unfortunately several of my family members have had some poor health issues recently so I've been making "Get Well" cards. On the bright side, at least they are on the mend ;)

For this card I used a Lily-Boo digi image that you can pick up HERE for FREE. All of the patterned papers are from the Pool House wall paper pack from Your Memories Here. I cut along the scalloped print of the olive paper and it gives the effect of a border punch!

This card also features the versatility of Pool House wall paper packs. For this one I made a masculine card using the front and back side of the blue paisley paper for my base and larger mat. Then I embossed a piece of blue card stock with the Herringbone Cuttlebug embossing folder (which are on sale right now at YMH). The "H" is a chipboard letter I covered with some more of the Pool House paper, this time the olive paisley. Then I gave it a glossy coating with some UTEE (ultra thick embossing enamel). A strip of crocheted lace trim from Prima finishes it off. The inside reads "Happy to hear you're on the mend". Since this card is for an older man I wanted to keep it clean without any images or frills.

Don't forget, you still have one week left to save 25% off your entire purchase at Your Memories Here with coupon code Follower

August 23, 2010

Little Joys


Good Monday to you! Today my card uses a fun little technique I tried for the first time, using some Prima flowers as a scalloped border. I adhered them to a strip of punched cardstock and then cut and embossed a top strip and adhered that over the top half of the Prima flowers. I then added some Silverbells Dew Drops and stamped and trimmed out the butterflies from the Wings Prima stamp set. Just another great way to use your Prima flowers!

August 22, 2010

Party!

Hello again everyone! Hope you are having an amazing and crafty Sunday! I am back this week to share a layout with you featuring some awesome products you can find in the Your Memories Here Store!

This layout features some recent photos from our son's 14th birthday party. What I love most about this layout is the large number of photos I got onto one page! That & the fabulous ruffle border I did around my diecut cardstock. I used some sheer, wired ribbon for the ruffle, but you can use any...including the fabulous ribbon you can find HERE! All the patterned papers are by Imaginisce and Pebbles, Inc. & I also used a bunch of Tattered Angels Glimmer Mist to spice up the diecut cardstock & distress the edges. I love this stuff! Don't have a particular color of paper on hand? Just use your Glimmer Mist to create your own!! I love banners, and since they are hot right now in the paper craft world, I decided to make one for my title. Super easy & super fun!

Thanks so much for taking the time to look at my project & I love hearing your comments too! I hope you check back tomorrow for some inspiration from the fabulously crafty Leah. Don't forget to visit the YMH Store for any of the products I used, browse the terrific selection, & enjoy the awesome prices! Plus, very soon Kristina will be stocking the YMH Store with some new goodies! Happy Craftin'!

August 21, 2010

Bind-it-all cupcake

I really like how this card turned out as it was so out of my norm. I took two cupholders from Starbucks and covered them in paper from Your Memories Here. Once covered I sanded the edges to give them a cleaned up distressed look (weird, I know). I then punched the holes in them to bind them. I however wasn't paying attention to where I was punching and punched on the wrong side on one, so I improved the mistake by dressing it up with ribbon to make a pretty bow on the back-side. I added some red sticky tape inside each cupholder along the bottom so that a giftcard could be tucked inside to make the card a cute little gift package too. The inside will have some white c/s added so that a message can be written to the person getting the card/gift. I then punched out the happy birthday message that can be found on one side of some double-sided paper called All Kinds of Happy found at YMH and mounted it on a big white flower (after I added streaks of pink to it). I found some random chipboard number and letter to make the "to you" part of the message. I painted them with some pink and pearl paint. Binding the two pieces together came next and I used a 1/2" Owire (Bind-it-all supplies can be found at YMH) since it I was making a card and didn't and didn't need anything bigger. After I was done with all of that it started looking like a cupcake to me. With that in mind I set out to make the card a cupcake one (as a bonus it will hide the giftcard that was peeking out of the second holder). I cut some white cardstock so that it would fit inside and resemble the top of a cupcake. Then I took the same ribbon I made the bow from and thought it would make for some nice frosting. I covered the top with red sticky tape and then just laid the ribbon down while playing with it trying to ruffle it and fall into a shape I liked. This was so much fun to make and I can't wait until I find the perfect person to get this.


August 20, 2010

Notes for Dani Embellies

Hi everyone!
Today I wanted to share the magnetic embellies to go with the note board I shared last week. Here's the board again:


I made a total of 4 magnetic embellies. I added a magnet disc to the backs of each one:
Here they are one at a time: (click on any pic for a closer peek)
For this one, I made a bow & added a rose to the center that I had sprayed with Tattered Angels Glimmer Mist in Tiger Lily- easy peasy!

Here's #2:
I used an old punch I had to punch "hi" & punched that out with a scallop punch. For a fun look, I added flame dew drops to each scallop- easy peasy!

Next up is #3:
I cut a strip from the same paper I used for my board (Prima Urban Cosmos-Village) & made a fan fold flower to which a I added a button decked out with a Prima Berry crystal and mini pearls around it. Easy peasy!

Last but not least is #4:
I used an alabaster round petal flower (gorgeous!) which I also sprayed with Tattered Angels Glimmer Mist then added Stickles to the edges for more sparkle :)  I def will be getting more of these as they are a perfect size for cards & layouts.

So here's a group shot:
All very different embellies, but were a snap to make! I hope Dani has lots of fun with her new memo/note board!

Don't forget to pick up all these goodies at YMH and because Kristina's computer is wonky right now, (until the end of August) you get 25% off your purchases! Just type in the coupon code: FOLLOWER at check out.

Thanks so much for popping in. Hope you have a great weekend!

August 19, 2010

Prima Tin

Hello Everyone! Happy Thursday! I had a lot of fun playing with this little Prima tin I got from Your Memories Here. I used the Tim Holtz Crackle Distress paint in Shabby Shutters to paint it then I put a coat of clear gesso on it to keep it from flaking off so much. I sprayed the corner of a damp rag with Adirondack wash in Espresso to lightly rub over it to distress it even more. There's not much you couldn't do to this tin and I love that! I used Prima flowers, leaves, Pearl swirls, and lace trim to decorate it. Of course I had to glimmer mist the flowers and leaves with Dazzling Diamonds too! I used the Pearls packaging and distressed the edges of that too to use inside the tin to add some interest through the little picture window. You could put whatever you want in there. To purchase the tin and the kit that comes with it visit click this TIN link and see how awesome it is for yourself! Go create yourselves a fabulous day! Kim

August 18, 2010

"Daddy and Me" 8x8 Scrapbook Layout: Brown and Beige

Hi Everyone:

It's Jess from KinderStampO. My project for this week is a fun "Daddy and Me" 8x8 Scrapbook layout. Who says you can't use Prima Flowers and bling for boys : ) I wanted to keep the colors really mono toned in order to make the black and white photo pop out. I love black and white photos : ) The paper is SEI and can be found at Your Memories Here

The die cut behind the picture is a fun technique I use.  I cut flowers on Fit to Page at a 3/4 in setting using the Plantin Schoolbook cart.  Then I take out all the flowers and distress the paper which remains. I use to throw them out but now I include them in my projects. It looks really cool and it's one less thing to throw out : ) The stamps are Frame this Alpha by Unity Stamp Co and are so fun you can use them on all your project. A must have for papercrafters. I hope you like it.


How I made it:

Stamps
Unity Stamp Company - Frame this Alpha
Embellishments
Eline Pearls
Gingham Ribbon
Prima Lace Braided Rose Cream Ribbon
Paper
8x8 in. SEI Paper
Punches
Ek Success 1in. circle punch

Happy Crafting,
Jess

August 17, 2010

I'll Make You a Deal

So it's me again, posting without a project to share. I could tell you all about what I've been working on but that just isn't the same without some pictures to go with it.
So instead how about we all go shopping?
Here's the deal, from now till the end of August you can save 25% off your purchase at Your Memories Here by entering the coupon code: FOLLOWER at checkout.
How's that for a sweet deal to make up for my bloggy absence? I sure hope to have my laptop back soon.

August 16, 2010

Determined

My daughter is very determined... and this picture was a perfect example of that. She just had to get this certian toy and it didn't matter how she got to it but got it she did:) I used some fun SEI paper for my background and Prima Flowers and some Prima bling. For my leaves I used some Pebbles ribbon. Don't you just love pictures that don't even need journalling, just a title that says it all?! Have a wonderful day:)

August 15, 2010

Rock On!

Hello my crafty friends! Hope everyone is doing fabulously! I am back to share a crafty lil' rocker gift card with you. Lately, for some reason, I have been on a gift card creating kick & figured this one would be perfect for our son & one of the many musical gifts we always get him!

The card features a fabulous Imaginisce Snag 'Em stamp. You can find these terrific stamps in the Your Memories Here store along with the fabulous Prima bling that I used. I just love the variety of products the store has to offer, as well as the fabulous prices too! You have to check it all out! On the inside of my card I added a rub-on and vintage sheet music to finish off the gift card.

Thanks so much for taking the time to check out my card! I do appreciate it and I hope you all have a rockin' week! Happy Craftin'!


August 14, 2010

Here's another quick and easy project. Perfect for those little teacher gifts: a post-it notepad holder with a cover. I used the acrylic 4x4 for the cover and the chipbaord 4x4 for the base with 3/4" OWire. I created a custumized cover useing Adirondeck ink refills and blending solution with the side I pounced on being the underside. I added some Prima flowers and pearl to the corner just to give it a little something extra. The chipboard is covered front and back with some Imaginisce Baby Powder/Oopsie Daisy paper from YMH. Again, this was a quick and easy project would be cute for a teacher gift (or part of a gift set). You can find you Bind-it-all (BIA) needs over at Your Memories Here. You can bet that I'll be doing LOTS of these for the holidays this year :)