August 31, 2011

Magnet Board

Hi everyone, Nancy here with a fun and easy home decor project for you.  Recently, I remodeled my kitchen, and, as is the style, I went with stainless steel appliances.   Unfortunately, magnets don't stick to stainless steel, so I needed to come up with a place to hang my grocery pad and other bits of paper.

I popped into my local hardware store and found a piece of sheet metal for the great price of $6.00 and spray painted it black.
I added a few sheets of patterned paper.  Helpful hint:  be sure and use thin papers as you want your magnets to stick and still hold down other paper items.
Jenni Bowlin patterned papers
Next, I added a few fun embellishments.  I didn't use too many and kept them to the corners as I did want this item to be functional as well as pretty.  These beautiful flowers and leaves came from the Your Memories Here store. I also used a piece of Prima Marketing lace that I spritzed with a bit of Tattered Angels Glimmer Mist to set off the different patterned papers.
Prima Marketing flowers and leaves.  Jenni Bowlin and Maya Road stick pins.
Prima Marketing lace, Tattered Angels glimmer mist
And here is my final project....

I mounted it to the cabinet that holds my refrigerator with Command Adhesive so as not to mar the surface.  The clock and the "white board" are also mounted this way.
Thanks for stopping by.

Nancy

August 29, 2011

Family Layout - Prima

Nanné here again with a layout filled with Pretty Prima flowers and lace trim..  i also used lots of sheer ribbon and tattered angles to glitter up a doily, can't forget my string of pearls either...LOL
I'm not much of an edge puncher, but wanted to add a little elegance to this layout and so grabbed my favorite edge punch by MS and went to town.. I luv how this layout came out <-- I tend to say that a lot..LOL

 and for a few close ups of the layout:
 I luve these big white Prima Alabaster Flower.. They go so well with everything and being that they are white, you can spritz them with tattered angels glimmer mist and add a whole new look to your layout..
my pink hydrangeas, which I seem to have a lot of  LOL  and can't forget this amazing lace trim that was just so much fun to work with and adds another elegant touch of detail to the layout..

and for supplised used:

My own stash: 
Doily, sheer ribbon, liquid pearl:white, string of pearls, MS around the edge punch & Edge distress tool..

From Your Memories Here:

there you go ladies.. I hope this layout inspires you to want to make one of your own.. nothing very difficult about it, just lots of different size and colored flowers clustered together and those Prima Leaves, just add that last bit of detail.. luv them!!
thnx for stopping today and remember, if you want more information on this layout or any of my other projects, do stop by my personal blog by clicking HERE.
Hope everyone has a wonderfully creative week.
Hugs

August 28, 2011

Layout Craziness!

Good Morning Blog Fans!

This morning I am going to share a layout with you. Now I dont do layouts as often anymore due to not feeling that 'groove' very much these days. That said I decided to push some paper around for this weeks posting.

I was itching to play with some inks and paints for this one but it just didnt work as well time wise as I had hoped so instead I dabbled in inks and some other goodies from my stash.

This layout is made using the wonderful Cosmo Cricket Garden Variety paper line It really is fun and fresh and it suited my photo of my daughter perfectly!
A project is never complete without an assortment of lush Prima Flowers. The large orange flower started out as a White Prima Flower that you can find in the store HERE. I spritzed it with some beautiful Glimmer Mist in Marmalade

The butterfly and other Prima flowers are leftovers from one of the Live With Prima kits. That yummy branch was in my stash and it looked like it really really wanted to be used up...but i coated it with Glimmer Mist in Olive Vine. I dripped some liquid Orange Ink across the background paper to give it some extra texture and colour. I grunged the edges of the paper a little with some pan pastels from my stash.

Overall I like the layout and who knows if I play with pushing paper around more my 'groove' will return. Until next week....enjoy your creative time...I am now off to finish painting our living room :)


August 27, 2011

A Technique Video

Hi Everyone! It's me, Kristina, sneaking on the blog today to share a video I made for our YouTube channel. It's a technique video using the new Goosebumps product from Tsukineko Ink.

We have the Goosebumps in stock at Your Memories Here if you feel compelled to try out these techniques or want to come up with some ideas of your own for it :)  I'd love to hear what you would do with it.

Hugs,


August 26, 2011

Altered Frame

Good morning....It's Sandi posting today and sharing a frame I made using goodies from Your Memories Here Store. I followed Julie Fei- Fan Balzer's awesome tutorial on the Prima Ustream Channel....love her tutorials. She is so much fun!Julie made it look so easy but I made such a mess and had to do so many coats and my gesso ended up looking like frozen green peas that had been in the freezer way too long. Here is a before and after of the frame(that's hubby and myself in the first frame...lol)
I first painted the frame teal, then added gesso over a Tattered Angels Fanciful Stencil.I then added some gold  paint and then watered down some brown paint but it just didn't look right so I then used black paint,Glimmer Mist, more black paint and then more mist....it just went on and on!!! 

My photo was too small for the frame so I stamped a mat using Tattered Angels Architectural-Trims clear stamps with Distress Ink in Old Paper and painted with Glimmer Mist. I also sprayed the Prima Flower and some cheesecloth that I tucked in behind the flower.
Here is a close up of the green pea effect
I then added Prima Trim and a little heart trinket and glued it all down with Helmar Adhesive(really good stuff). You can buy all those wonderful goodies at Your Memories Here so be sure to check it out!!! Would love for you to visit my blog and I wish you all a FABULOUS weekend!

August 24, 2011

Why I Love Distress Inks

Hi everyone, Nancy here today to share why I love Distress Inks.  I know, I use distress inks a lot...they are really one of my favorite products.  I seem to use them almost daily.  Why?  because I feel they add so much to my projects.

I was recently working on this layout of my son.  The papers are beautiful, but they don't have much depth and in my option, and for my scrappy style, they don't blend together.  They are beautiful, but......
Tim Holtz Kraft Resist paper, Authentique patterned papers
So, I used my foam inking tool and a few different colors of distress ink in blues and browns and came up with this.
Tim Holtz Kraft Resist paper, Authentique patterned papers, Basic Grey alphabet,  Tim Holtz Distress Inks, Tattered Angels Glimmer Mist and Tag.  Custom dyed seam binding
Now the colors blend seamlessly.  I was also able to add a quick swipe of ink over some naked chipboard to blend it into the layout.   I also added a bit of ink, as well as some Tattered Angels Glimmer mist to my tag to blend it in as well.

I really like the inked layout so much better.  That said, my dh...he likes the one without the ink.  I guess it takes all kinds.  So....which do you like better?

Nancy

August 23, 2011

Blessed...


Don't you just love the sweet versatility of Prima Marketing products? I just love how I can use them on a wide variety of projects, plus they always go so perfectly with my addiction to Tattered Angels Glimmer Mists! So this week for my Your Memories Here DT post, I decided to scrap some recent photos of myself and journal about all the wonderful blessings in my life. Life gets hard sometimes and it is so easy to get down about things, but I think counting your blessings helps keep things in a much needed perspective. Also, I'm pretty bad about never scrapping myself. I am usually the one always taking the photos & scrapping about everything else...but me. Then I realized that I need to do this too so my son has some more personal pages to look back on when he's older. And I can look back and realize exactly how old I've gotten...LOL!


The patterned paper is from Prima's Madeline Collection & is so lovely. The butterflies are from another sheet of Prima paper that I used just to do some fussy cutting. And the journaling spot is actually some recycled Prima rub on packaging. I just love their packaging because they always make it pretty enough to reuse! I wish I knew the manufacturer for the felt title, but I don't. I just picked it up a few years ago & am finally using it. It was this bold orange but I used a couple of Tattered Angles Mists (chalkboard mist in peacok & glimmer mists in fall breeze and vintage rose) to make it a more muted olive and match the paper better. Also, believe it or not, this was my first time using Perfect Pearls! I recently picked up a bottle & boy, have I been missing out. They are soooo easy to use & I absolutely loved the results! I can quickly see these becoming my newest addiction!


Supplies
Perfect Pearls - Ranger (bisque)
Butterfly Ribbon - The Paper Studio
Doilie - Wilton
Journaling Pen - Pentel
Adhesives - Glue Glider Pro, Aileen's Quick Dry Glue
Felt Title - Stash 

If you want to grab some of these fabulous Prima products, and Tattered Angels mists as well, hop on over to the Your Memories Here Store! There is a fabulous selection of products in the store & you can get them at amazing prices too. And if you'd like some information on this or any of my other projects, I'd love it if you'd visit my blog HERE! Until next week, Happy Craftin'! 


August 22, 2011

Friends Forever Layout-Prima

Happy Monday and its me again, Nanné here with some more Prima goodies to share with you...
I created this layout using Prima papers, flowers and lace ribbon trim..  I also inked the edges of the paper with Tim Holtz distress ink to give it more of a vintage look.. Luv the way it came out! :)

For the centers of the hydrangeas, I added a drop of Gemstone glue, cut a pearl of the string of pearl glued it down and then covered them with Diamon Stickles..

I also used the Gemstone Glue, to glue down the lace trim and the string of pearl..which worked amazingly with the pearls..just need to let it dry a little bit before attaching the pearls..once  it gets tacky, then push down your string of pearls and it won't make a mess.. I wish I would of known that ahead of time..LOL  But this is a definite must have product when wanting to add trim or just adding small details..

Here are a few close ups for you of the layout:

The photo is of my brother and I waaaaaaaay back when we were small..LOL
I luv clustering flowers and I've learned when doing so, always start with your biggest flowers first, then add the smaller ones .. and play with color, cause you never know what colors will actually make your layout pop.. 

and for the supplies I used:


From My own Stash: 
Prima Regent flower collection,  Prima Hydrangeas, white small flowers, hat pins; string of pearl & bingo card! Cricut for Flourish, white Liquid Pearl & trinket..

From Your Memories Here:

Well ladies.. that does it for me for this Monday... I want to thank you all so very much for stopping by today and checking out what I've been able to create with a few beautiful Prima pieces.. Hope I inspired you to want to create a flowered masterpiece of your own..  For any other information or detail to this layout, please stop by my personal blog by clicking HERE and I will always be more than happy to answer questions you have regarding any of my projects.. I'm always here to help :)
Hugs

August 21, 2011

Picture Perfect!

Hi there Bloggers!

Today I am wanting to share a gorgeous Prima Photo Frame that I played with this week. After seeing how the gorgeous Lolly Chessie had altered one of them I decided to give it a go but do it in a style that would suit my home decor. So I grabbed some warm white paint as well as some of this wonderful Prima paper . It started as I was going to use the more solid side of the paper for the frame until I realized that the stunning newspaper print on the reverse was just too perfect for words! I rummaged through my stash and grabbed out a Prima branch that was all but begging to be used for this.
The beautiful flower is left over from the stunning kit that can be found HERE in the store
The ribbon at the bottom of the frame can be found HERE
I inked edges of the cute bird with Tim Holtz Distress Ink as well as rubbing some Iridescent Gold liquidtex ink over the creases and crevices of the frame.

The photo is of my youngest daughter Jess who was 2.5 at the time. A wonderful friend of mine Sarah Gladman took this photo of her when she first got her Canon 450D all those years ago.

Anyway I hope you feel a little inspired to create some wonderful home decor with these gorgeous frames by Prima

Until Next week...

Hugs and Hot Glue.

August 19, 2011

Another Happy Birthday Card


Hi everyone...this is Sandi posting today with yet another card!!!I made this using My Minds Eye Bloom and Grow Collection from my stash.I had seen the idea to use the number on someone's blog but can't remember who.I used my Martha Stewart lace doily punch on the edges and sewed around each square with my sewing machine. The numbers were white Thickers that I colored with Oriental Poppy Glimmer Mist and then added Antique Linen Stickles to the numbers, punched butterflies and flower. I then added some Prima E Line Pearls and Prima Leaves to my flower.Here are a few close-ups:

You can buy all those wonderful goodies at the Your Memories Here Online Store. You can also visit my blog here.Thanks so much for looking and have a GREAT weekend!!

Sandi

August 18, 2011

A Little Treat For the Teacher


I've got a quick post for ya'll today. Tonight is a meet-the-teacher night for my son who is starting Kindergarden this year. We will be giving a little gift to his teacher. I made this cute little backpack using some Prima paper from YMH. I put in a little pen, a mini tide stick, and a mini hand sanitizar. In the little front pocket my son will write his new teacher a little welcome note. Now I have to get back to getting my own classroom ready :)

August 17, 2011

Annalee and a Birthday

Hi everyone, Nancy here with a birthday card I recently made using the gorgeous Annalee papers from Prima Marketing and a sketch from Sassy Lil' Sketches.
This card is actually a pop up, with a bouquet of flowers that I fussy cut on the inside.
I also added in bits of beautiful trims and a few gorgeous flowers from the Your Memories Here store as well as a piece of Prima packaging.  You  know we all have to be green.  hee hee

Anyway, I hope the recipient enjoys her card.  Thanks for stopping by.

Nancy

August 16, 2011

He's Our Best Friend...


Hi y'all! I'm back again today to share my usual Your Memories Here DT post, but this time the focus is on our gorgeous fur baby, Sidney! See, our Sid is a special Boxer boy. We rescued him 5 years ago from a local shelter & he has been such a joy, not to mention an adventure as well! We love him so very much...especially his sweet kisses & clowning around. When I found this Basic Grey paper from the Max & Whiskers collection at a super duper sale for 75% off I knew exactly what I wanted to do! Only problem is I needed some matching letters & ribbon, which is where my Tattered Angels mists from the Your Memories Here Store came in super handy!! You can grab the colors I used HERE!

The yellow ribbon is some fabulous Tim Holtz product (originally a beautiful shabby white) that dyes so easily. And although it looks like I only used one shade, it is actually two colors to get the just right shade of yellow to match the LO. I used Tattered Angels Chalboard Mists in Alaskan Salmon & Firefly for the ribbon, while I used Tattered Angels Chalboard Mist in Peacock & Glimmer Mist in Fall Breeze for the flocked letters. These flocked letters I snagged for a buck at my local Dollar Store take color so amazingly well. I just love that with Tattered Angels products I can customize anything to suit my needs...which is definitely cost effective too. Oh, and that fabulous orange ribbon? Prima Marketing, of course! I just love it so much! And while I used my Tim Holtz Distress Ink on the photo like I always do, I used some new Jenny Bowlin ink in Spice Tin to edge everything else.


Supplies 
Cardstock - Cloud 9 Design
Patterned Paper - Basic Grey (max & whiskers collection)
Ink - Tim Holtz Distress (walnut stain), Jenny Bowlin (spice tin )
Letters -  My Little Shoebox (yellow), Dollar Store (large flocked)
Punches - Martha Stewart, Stampin' Up
Adhesives - Glue Glider Pro, Pop Dots, Aileen's Fast Grab Tacky Glue


Thanks so very much for stopping by! I always love to read all of your comments cause they mean so much to me...you guys rock!! You'll definitely want to check out the YMH Store for some great new products by clicking HERE. As always, if you'd like some more information or just want to visit, stop by my blog HERE. Would love to see you there! Until next time, Happy Craftin'!

August 15, 2011

First Dance- DT project from Nanné

Happy Monday to you lovely ladies...
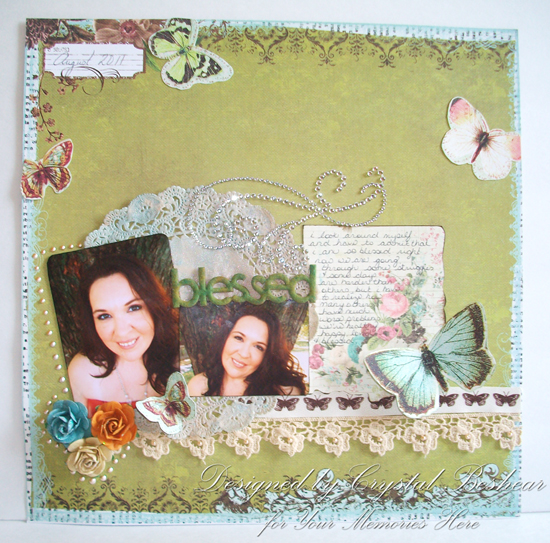
This is Nanné and I wanted to share a layout I made using some Prima E-Line white flowers, Tattered Angels Glimmer Mist and some E-line pearl drops..
These papers I found in my stash, they are by Bo Bunny and I was trying to focus on the bottom corner of the layout, not to cover the butterflies..
the photo is of me back in 1984, my mom was getting me ready for my first jr high school dance and of course, like us moms, she liked to take photos to remember the special occations..
and here are a few close ups of the layout.


 These E-Line white flowers are awesome when sprayed with the glimmer mists..
if you want a light color, just spray further away, but if you want a deeper color spray them
close up.. which is what I did here..then you can either use your heat gun to dry them quickly or let the dry over night..


for supplies used.


from my own stash:
Big Prima flowers, leaves, flourish, string of pearls, Prima trinket, hat pins, glossy accents and papers!

well ladies..That does it for me for today.. do stop by Your Memories Here and check out her wonderful sellection of items I used to create this layout and thank you for stopping by today and taking a look at what I've created..  You can also stop by my personal blog for more information on the making of this layout..just click HERE
Hugs